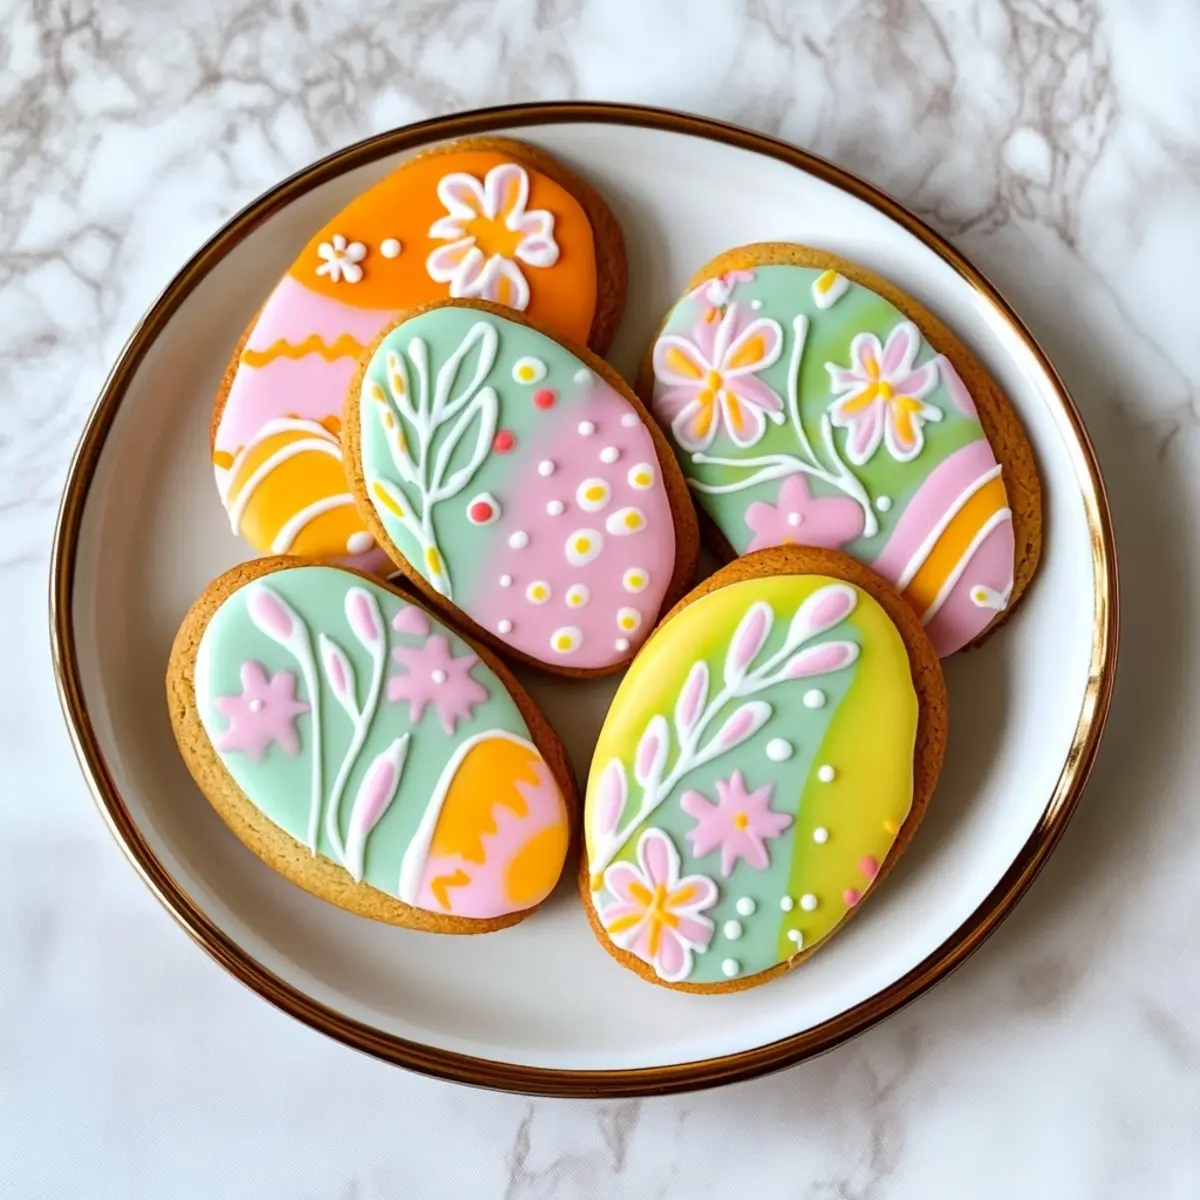
As Easter approaches, the kitchen bursts with the delightful scents of springtime, filling the air with an irresistible sweetness. I recently discovered a fantastic way to add a personal touch to our holiday spread—Fun and Easy Hand Painted Cookies. Not only are these cookies a treat for the taste buds with their buttery vanilla flavor, but the playful decorating process turns them into colorful masterpieces that everyone will adore.
Picture this: your family gathered around the table, laughter echoing as you paint delicate designs on each cookie, letting creativity flow like icing from a piping bag. These cookies aren’t just delicious; they’re a festive focal point that invites joy and togetherness on your Easter table. With customizable flavors and an artful twist, this recipe promises to elevate your holiday gatherings, ensuring that everyone leaves with both full bellies and smiles. Get ready to channel your inner artist while creating sweet memories!

Why Love Fun and Easy Hand Painted Cookies?
Fun and Easy Hand Painted Cookies are a delightful way to celebrate the spirit of Easter!
- Creative Fun: Gather friends and family for a joyful decorating session that sparks laughter and connection.
- Customizable Flavors: Tailor the cookie dough and icing to suit everyone’s taste—think lemon zest or almond for a twist!
- Eye-Catching Presentation: With vibrant colors and whimsical designs, these cookies serve as stunning table centerpieces.
- Perfect for Gifting: Package them up for a sweet gesture to loved ones or as party favors!
- Memory-Making Activity: Encourage kids and adults alike to express their creativity while baking—who doesn’t love a personal touch at the holiday table?
For an extra delicious addition to your Easter spread, check out these Hearty Sheet Pan recipes that everyone will enjoy!
Fun and Easy Hand Painted Cookies Ingredients
For the Cookie Dough
- All-Purpose Flour – Forms the base of the cookie dough, providing structure and texture. Ensure proper measuring by spooning and leveling for best results.
- Baking Powder – A leavening agent that helps cookies rise for a tender texture.
- Salt – Enhances sweetness and balances flavors; essential in all baked goods.
- Unsalted Butter – Adds richness to the dough. Must be softened to room temperature for easier mixing.
- Granulated Sugar – Sweetens the cookies while contributing to their delightful texture.
- Large Egg – Acts as a binder, adding moisture that holds the dough together.
- Pure Vanilla Extract – Infuses warmth and enhances sweetness.
- Almond Extract (optional) – Adds a subtle nutty flavor; can be substituted with vanilla or citrus extracts.
For the Icing and Decoration
- Royal Icing or Easy Cookie Glaze Icing – Used for decorating. Can be made from powdered sugar, egg whites, and lemon juice.
- Gel Food Coloring – For vibrant colors in icing to create eye-catching designs.
- Sanding Sugar Sprinkles – Adds texture and visual appeal to your decorated cookies.
- Mini Marshmallows (halved) – Used as adorable bunny tails for decorating.
These Fun and Easy Hand Painted Cookies are not just a treat for the taste buds; they’re also a canvas for creativity on your vibrant Easter table!
How to Make Fun and Easy Hand Painted Cookies
-
Combine Dry Ingredients: In a medium bowl, whisk together the flour, baking powder, and salt. Set aside to ensure even mixing and that your cookies bake up perfectly.
-
Cream Butter and Sugar: Beat softened butter and granulated sugar in a large bowl until creamy and light. This should take about 3-5 minutes. You’ll know it’s ready when it’s fluffy and pale in color.
-
Add Egg and Extracts: Incorporate the egg, vanilla extract, and optional almond extract. Beat until well combined for a flavorful dough that’s bursting with sweetness.
-
Mix Dough: Gradually add the dry mixture to the wet ingredients on low speed until just combined. If the dough feels sticky, sprinkle in more flour one tablespoon at a time to achieve the right consistency.
-
Chill Dough: Divide the dough in half, roll each piece out to a 1/4 inch thickness, and refrigerate for 1-2 hours. Chilling is key for easy handling and shapes!
-
Preheat and Bake: Preheat the oven to 350°F (177°C). Cut out your desired shapes and bake for 11-12 minutes until the edges are lightly browned. Let cool on wire racks for easy decorating.
-
Decorate Cookies: Prepare your icing, tint it with gel food colors, and unleash your creativity! Decorate the cooled cookies and let the icing set before showcasing your festive treats.
Optional: Sprinkle sanding sugar on top for an extra sparkle.
Exact quantities are listed in the recipe card below.
How to Store and Freeze Fun and Easy Hand Painted Cookies
Room Temperature: Keep cookies in an airtight container for up to 5 days to maintain freshness and flavor.
Fridge: For slightly longer storage, you can refrigerate the cookies in a sealed container for up to 7 days.
Freezer: Freeze cookies between layers of parchment paper in an airtight container for up to 3 months. Thaw at room temperature before decorating.
Reheating: If desired, warm cookies in the oven at 300°F (150°C) for about 5 minutes to restore that fresh-baked taste!
Make Ahead Options
These Fun and Easy Hand Painted Cookies are perfect for busy home cooks looking to save time during the Easter rush! You can prepare the cookie dough up to 3 days in advance by mixing and chilling it. Simply roll it out, wrap it tightly in plastic wrap, and refrigerate. For even more convenience, you can freeze the dough for up to 2 months. When you’re ready to bake, just thaw in the refrigerator overnight, cut into shapes, and bake as directed. To keep your cookies just as delicious, ensure that the icing is fully set before stacking or storing them in an airtight container. This way, you can enjoy beautifully decorated cookies with minimal last-minute effort!
Expert Tips for Fun and Easy Hand Painted Cookies
- Chill for Success: Chilling the dough is crucial for clean-cut shapes and helps flavors develop; don’t skip this step!
- Creative Shapes: Use a variety of cookie cutters to create thematic Easter shapes; it adds a unique touch for your celebration!
- Icing Consistency: Ensure your icing is the right consistency—too runny, and designs will bleed; too thick, and it won’t pipe well.
- Set It Right: Allow icing to harden completely before stacking or storing cookies; this prevents smudging of your beautiful designs.
- Flavor Variations: Feel free to experiment with flavorings like lemon or coconut in your cookie dough for a personalized twist to these Fun and Easy Hand Painted Cookies!
Fun and Easy Hand Painted Cookies Variations
Embrace your creativity by exploring these fun twists on our delightful cookies!
-
Citrus Burst: Add lemon or orange zest to the dough for a zesty fresh flavor that brightens each bite.
-
Nutty Delight: Replace almond extract with hazelnut or macadamia nut extract for a unique, nutty twist! This will add an unexpected depth to your cookies.
-
Chocolaty Indulgence: Mix in mini chocolate chips or chunks into the dough for a rich and gooey chocolatey bite. Chocolate and vanilla flavors are always a winning combination!
-
Gluten-Free: Swap all-purpose flour for a gluten-free blend to ensure everyone can enjoy these delicious cookies without any dietary concerns.
-
Spicy Kick: Add a pinch of cinnamon or nutmeg to the dough for a warm spice flavor that pairs perfectly with the sweetness. It adds a cozy touch that enhances the Easter spirit.
-
Colorful Icing: Use a variety of gel food colors to make multi-colored icing, and pipe patterns that are as delightful to the eyes as they are to the tastebuds.
-
Fruity Explosion: Fold in dried fruits like cranberries or apricots into the dough for a chewy texture and a burst of fruity sweetness in every bite!
-
Vegan Twist: Substitute butter with coconut oil and use a flaxseed egg for a delightful vegan alternative that doesn’t compromise on flavor.
Unleash your culinary imagination by trying these variations, and watch your Easter celebration become even more delightful!
What to Serve With Fun and Easy Hand Painted Cookies?
Get ready to create a charming feast that perfectly complements your festive cookies!
-
Fluffy Vanilla Cupcakes: These airy cupcakes offer a lovely sweetness that mirrors the cookies, making them a delightful pairing for your dessert table.
-
Easter-Themed Fruit Salad: A refreshing mix of seasonal fruits like strawberries and blueberries adds a splash of color and balances the sweetness with a burst of freshness.
-
Creamy Chocolate Mousse: Indulge in a rich and velvety chocolate mousse that contrasts beautifully with the lightness of the cookies, offering a luxurious dessert option.
-
Refreshing Iced Tea: A cool glass of iced tea, whether sweetened or herbal, complements the cookies and provides a refreshing sip that enhances the festive spirit.
-
Mini Carrot Cake Bites: These petite cakes bring heartiness to the table with their spiced flavor and cream cheese frosting, making them a perfect Easter treat alongside your cookies.
-
Nutty Biscotti: Crunchy and flavorful, biscotti enhance the cookie experience while providing a fun texture contrast, ideal for dipping in coffee or tea.
-
Chocolate-Dipped Strawberries: The sweet and slightly tart strawberries drizzled in chocolate create a romantic touch and are a tasty, easy bite that rounds out your Easter spread beautifully.
-
Lavender Lemonade: This floral twist on classic lemonade serves as a delightful drink that pairs perfectly with the cookies’ sweetness and adds a refreshing zing.
-
Cheesecake Bites: Bite-sized and creamy, these cheesecake treats provide a rich but not overwhelming dessert option, balancing perfectly with your cookies’ whimsical nature.
Fun and Easy Hand Painted Cookies Recipe FAQs
What ingredients should I choose for the best flavor?
Absolutely! For the finest flavor, use fresh, high-quality ingredients. Ensure your butter is unsalted and at room temperature for easier mixing, and always opt for pure vanilla extract rather than imitation for a richer taste. When selecting eggs, go for large ones as they provide the right moisture and binding needed for the cookie dough.
How should I store my decorated cookies?
To keep your Fun and Easy Hand Painted Cookies fresh, store them in an airtight container at room temperature for up to 5 days. If you want them to last a bit longer, you can refrigerate them for up to 7 days. Avoid stacking them until the icing has completely set to prevent smudging!
Can I freeze the cookies, and if so, how?
Yes, you can freeze your cookies! To do this, place each cookie between layers of parchment paper in an airtight container. They can be frozen for up to 3 months. When you’re ready to enjoy them, simply thaw them at room temperature for a few hours. This helps maintain their delightful texture!
What should I do if my icing is too runny?
Very! If your icing ends up too runny, don’t worry; you can easily thicken it. Simply add more powdered sugar, a tablespoon at a time, mixing until you reach the desired consistency for decorating. On the flip side, if the icing is too thick and difficult to pipe, add a few drops of water to thin it out!
Are there any dietary considerations for pets or allergies?
It’s important to note that some ingredients in these Fun and Easy Hand Painted Cookies, like butter, sugar, and certain extracts, are not safe for pets. If you’re serving these cookies at gatherings, be sure to inform guests of any potential allergens, especially if you’re using ingredients like almond extract, which can trigger nut allergies.
Can I personalize the flavors for different occasions?
Absolutely! You can personalize the flavors by substituting the almond extract with coconut, lemon, or even orange for a refreshing twist. Adding citrus zest to the dough can elevate the flavor profile too. Feel free to mix and match to create special variations tailored for your festive occasions!
These Fun and Easy Hand Painted Cookies Recipe FAQs should help you navigate your baking adventure with ease!
Fun and Easy Hand Painted Cookies for a Vibrant Easter Table
Equipment
- Mixing bowls
- Whisk
- Mixer
- Cookie Cutters
- Baking Sheets
- Parchment paper
- Cooling rack
Ingredients
For the Cookie Dough
- 2 cups All-Purpose Flour Ensure proper measuring by spooning and leveling for best results.
- 1 teaspoon Baking Powder
- 1/2 teaspoon Salt Essential in all baked goods.
- 1 cup Unsalted Butter Must be softened to room temperature for easier mixing.
- 1 cup Granulated Sugar
- 1 large Large Egg Acts as a binder.
- 1 teaspoon Pure Vanilla Extract
- 1/2 teaspoon Almond Extract Optional; can be substituted with vanilla or citrus extracts.
For the Icing and Decoration
- 2 cups Royal Icing or Easy Cookie Glaze Icing Made from powdered sugar, egg whites, and lemon juice.
- As needed Gel Food Coloring For vibrant colors in icing.
- 1/4 cup Sanding Sugar Sprinkles Adds texture.
- 1 cup Mini Marshmallows Halved, used as bunny tails for decorating.
Instructions
How to Make Fun and Easy Hand Painted Cookies
- In a medium bowl, whisk together the flour, baking powder, and salt. Set aside.
- Beat softened butter and granulated sugar in a large bowl until creamy and light, about 3-5 minutes.
- Incorporate the egg, vanilla, and almond extracts, beating until well combined.
- Gradually add the dry mixture to the wet ingredients on low speed until just combined.
- Divide the dough in half, roll each piece to 1/4 inch thickness, and refrigerate for 1-2 hours.
- Preheat oven to 350°F (177°C), cut out shapes, and bake for 11-12 minutes until edges are lightly browned.
- Prepare the icing with gel colors and decorate the cooled cookies, letting the icing set before serving.
Leave a Comment